Thursday, May 22, 2014
Chicken marinara pizza
Chicken marinara pizza

Ingredients
For the topping
- Chicken breast 2
- Onion 1
- Mozzarella cheese 1 packet
- Finely chopped garlic 3 cloves
- Finely chopped parsley 1/4bunch
- Tomato paste 1/2cup
- Oregano 1tbsp
- Crushed red chilies 1tbsp
- Black pepper powder 1/2tsp
- Oil 3tbsp
- Salt as required
For the dough
- Flour 250g
- Eggs 2
- Milk 1/2cup
- Granulated yeast 1tbsp
- Butter 3tbsp
- Salt as required
Method:-
- Stir in 1tbsp of granulated yeast in ½ cup milk .In a separate bowl mix the flour with the milk and yeast mixtureAdd 2 beaten eggs, salt as required, 3tbsp butter and water as required.Knead to form a smooth dough .Cover with a plastic wrap and leave the dough until it doubles in volume.
- In the meantime slice the chicken breast .Heat 3tbsps oil in wok and fry 3 cloves of garlic and chicken strips. Fry until the color of the chicken and garlic changes.Add ½ cup tomato paste, salt a srequired,1/2tsp black pepper powder,1tbsp oregano,1tbsp crushed red chilies and ¼ bunch chopped parsley Mix well
- Roll out the dough with a rolling pin and place on a greased pizza mould. Brush the edges of the base with a beaten egg.Spread the chicken and tomato sauce on the pizza base. Top with chopped onions, and grated mozzarella cheese.
- Bake at 190C for 12- 15 minutes or until golden brown.
Wednesday, May 21, 2014
Crispy alu chat
Crispy alu chat

Ingredients
- Potatoes peeled, chopped and boiled ½ kg
- Oil ¼ cup
- Garlic 1 tsp
- Salt 1 tsp
- Black pepper ½ tsp
- Chili powder 1 tsp
- Crushed red pepper 1 tsp
- Chat masala 1 tsp
Imli pulp 1 cup
- Spring onion chopped with leaves ½ cup
- Sugar 1 tsp heaped
- Coriander leaves chopped 2 tbsp
- Green chilies chopped 2
Ingredients for baghar
- Curry pata hand full
- Mustard seeds 1 tsp
To serve
- Samosa pattis cut in thin strips and deep fry.
Method
- Heat oil add baghar add garlic paste, salt, black pepper, chili powder, chat masala and imli pulp, cook for 5 minutes add boiled potatoes, toss well, remove in a platter, sprinkle with chopped greens, serve garnished with fried samosa patti
Tuesday, May 20, 2014
Crullers or twisted doughnuts Kleinur

In many homes in Iceland a large cooking pot lurks in a kitchen cupboard. Its sides are black with burnt-in fat, and a guest might be excused for thinking that their hosts simply forgot to throw it away. Occasionally, in some homes as often as once a week, this pot will be pulled out from its hiding place and put to good use for frying doughnuts in. It is not unusual for a doughnut-maker to make a double or even triple recipe in one session.
Twisted doughnuts are not a specifically Icelandic phenomenon, but neither are they as common in other countries. Making these delicacies is no small undertaking. It is time consuming and hard work, and therefore the batches are usually large to save time and effort.

I am including 2 recipes, one with hartshorn and one without it, as hartshorn seems to be quite difficult to find outside Europe. Both recipes are mixed and handled in the same way.
 |
| Ready to fry dough and fried kleinur. |
500 g flour
40 g margarine/butter, soft
2 tsp bakers ammonia/hartshorn salt (ammonium carbonate)
2 medium eggs
1 tsp baking powder
150 ml milk, sour milk or buttermilk
150 g sugar
2 tsp essence of cardamom
2nd recipe:
1 kg flour
150 g butter
250 g sugar
3 eggs
4 tsp baking powder
2 tsp baking soda
3 tsp powdered cardamom
a few drops of vanilla essence
250 ml buttermilk or cream
Mix together dry ingredients. Mix in the margarine/butter and then eggs and milk/cream, followed by the essence of cardamom or vanilla essence. Knead into a fairly soft dough. Avoid over-kneading, as this will make the doughnuts tough.
 |
| Making the twist. |
Heat the frying fat. It must be very hot, and will have reached the right temperature when a doughnut browns and cooks through in about 1-1 1/2 minutes.
Genuine Icelandic twisted doughnuts are fried in sheep tallow, which leaves a special taste, but this is now considered unhealthy because of all the saturated fat. Use instead about a litre of vegetable cooking fat that can be heated to a high temperature, for example canola or coconut oil. The doughnuts will not have that special tallowy taste, but neither will they clog up your arteries quite as much.
 |
| When they reach this colour, remove from fat. |
Most deep-fryers can not get the oil hot enough for frying kleinur - but they are safer than using a pot on the stovetop. If you do use a fryer, heat the oil to the maximum temperature, and allow the oil a short time to heat up again after each round of doughnuts.
Interesting tidbit:
I found an American recipe for twisted doughnuts in The Little House Cookbook by Barbara M. Walker (New York, N.Y., Harper & Row, 1989). The recipe is taken from an old American cookbook, and although the twisting method is quite different, the recipes themselves are clearly related.
Monday, May 19, 2014
Instant Green Moong Curry

Green moong / mung beans are natures best offering for vegetarians. High in protein and yet easily digestible with the bonus of extra fiber makes this a super food. Some people find the soaking routine a deterrent. Where is time to plan ahead of time, most of the time! As much as I love these wonder beans, I invariably forget to soak them or sprout them. But with a recipe like this on hand, I can have mung as many times in a week as I like. Besides, Ayurveda considers Mung beans as one of the very few foods which balances all three doshas. More on Mung beans and Ayurveda here.
This is a very versatile dish that pairs superbly with rotis / puris / bread or rice. A bowl of yogurt comes handy to cool of the spicy overtones.
 My wholesome lunch today - Phulka rotis with mung curry and spiced raw mango slices
 Instant Green Moong / Mung Beans
Time taken - Under 30 minutes
Category - Side, Rice / Roti accompaniment, Vegetarian protein, Ayurvedic food
Recipe source - Own
Makes 2 large portions, use 1 cup dry beans to make 4 generous portions
special equipment
A pressure cooker is an absolute must for this recipe
ingredients
1/2 cup dry green mung /moong beans
1 tbsp oil
1 tsp cumin seeds
1 tsp mustard seeds
Pinch of asafoetida (optional)
1-2 green chillies, chopped fine
1/2 inch piece ginger, pounded or chopped fine
1 medium onion, finely chopped
1 large juicy tomato, finely chopped
1/2 tsp turmeric powder
1/2 tsp garam masala powder
1/2 tsp subzi powder (I use Everest brand, use any curry powder or cumin-coriander powder)
1 tsp salt or to taste
Slices of lime and chopped coriander leaves for garnish
directions
Place the mung beans in a pressure cooker, smaller the cooker, the better. Wash them thoroughly after checking for stones. Add two cups water to mung, close cooker, fit the whistle and keep the flame on medium-high.
After one whistle, reduce flame to minimum until 3-4 more whistles are let out. Remove cooker from flame and let cool.
While the beans are cooking, you can prepare the masala. In a kadai / wok, heat the oil. Splutter the cumin and mustard seeds, add a pinch of asafoetida with the flame on medium. Add the ginger, chillies, onions with a pinch of salt, saute for 5 minutes or so, until the onions are soft.
At this point, add the tomatoes with the spices (turmeric, garam masala, subzi masala) with the remaining salt. Stir it well for 3-4 minutes until the masala comes together as a rough paste.
Once the cooker has cooled off, release the pressure and open the lid. The mung beans must have cooked to a soft consistency and not entirely mushy. (If they are not cooked enough, then keep them back with some water for one more whistle on a medium flame) Empty the cooked mung beans into the masala. If very thick, add 1/2 cup water and boil the mung for 2 minutes along with the masalas.
Adjust salt as per taste and remove from flame. Garnish with coriander leaves. Serve hot with rice, rotis or bread, along with slices of lime and a bowl of yogurt.
Most ingredients for this recipe can be found in your pantry, so this recipe is good for a day when there are no veggies at hand.
Since mung is such a healthy food ingredient, would love to hear from you about your favourite recipe using moong. I could do with more ideas for this green wonder!
Other fun reads
Inside the Indian household - Coriander at Daily Tiffin
The Food Times of India | Volume 1:April 2007 at Dining Hall
Tags:
Sunday, May 18, 2014
SUKHI URAD DAL DRY SPLIT BLACK GRAM
SUKHI URAD DAL (DRY SPLIT BLACK GRAM)


INGREDIENTS
- Urad Dal-1 cup
- Tomatoes puree form-1 medium sized
- Cumin seeds (jeera)-1/4 teaspoon
- Asafoetida (hing)-half a pinch
- Turmeric powder-1/4 teaspoon
- Red chilli powder-1/4 teaspoon
- Salt to taste
- Garam masala powder-1/4 teaspoon
- Oil-1 tablespoon
- Water-2 cups
METHOD
- After washing, soak the urad dal in water for 30 minutes.
- After 30 minutes, drain out the excess water from the dal.
- In a pan, heat oil, add asafoetida (hing) & cumin seeds (jeera) & as they crackle, add tomatoes.
- To the tomatoes, add turmeric powder, red chilli powder, salt mix well.
- As the mixture leaves oil add urad dal & mix well.
- Fry dal for 2 minutes & add 2 cups water.
- As the water comes to a boil, lower the flame & cover the pan half with the lid.
- Keep checking in between & as the water dries up completely, add garam masala powder & turn off the flame.
- Cover the pan completely with the lid for 5-10 minutes.
- After 5-10 minutes, stir dal well & sukhi urad dal is ready to serve.
Saturday, May 17, 2014
Khat Mithi rani ki Chutney
Khat Mithi rani ki Chutney

Ingredients:
- 110 gms dates
- 25 gms tamarind
- 1 cup warm water
- 1 tsp salt
- 1 tbsp sugar
- 1 tsp red chili powder
- ½ tsp cumin seeds
- ½ tsp garlic crushed
Method:
- Soak the sates and tamarind in water for an hour.Blend with all the remaining ingredients and serve.
Friday, May 16, 2014
Win Freschetta Frozen Pizza

Click Here to enter contest and win
This contest is open for US citizens (sorry dear non USA followers)...I was just told about this by my friend. If you like to participate please click on the link.
Thursday, May 15, 2014
Baked Custard Pie
Custard pie is one of those things that seems to have fallen out of fashion. Its more subtle than flashy, I guess, with the contrast of the smooth custard and crumbly crust, delicately flavoured with a little vanilla, nutmeg and cinnamon; definitely not in the death-by-chocolate catagory. On the other hand, thats what I like about it. Best served with a good cup of tea.
The technique for making the pastry is quite unorthodox. The result is not a typical flaky crust, but one with a delicate shortbread-like texture. I found it a bit difficult to roll thin enough; the crust wanted to break up as I transferred it to the pan. On the other hand, it was very easy to press it back together again, and I dont think overhandling is as big a problem as it is with regular pastry. I adapted the technique from a recipe by Jane Grigson.
6 to 8 servings
1 hour 30 minutes - 30 minutes prep time

Make the Crust:
1/2 cup unsalted butter
1 teaspoon sugar
1/4 teaspoon salt
1 3/4 cups soft unbleached (pastry) flour
Preheat the oven to 400°F
Melt the butter with the sugar and salt, over very low heat (or in the microwave). Mix in the flour, until it no longer shows any white, and a crumbly dough is formed.
Roll it out on a piece of parchment paper to fit a 9" pie plate, and transfer it to the pie plate. Be sure to roll it out as thinly as you can.
The dough is rather crumbly, so will likely need a bit of patching to go back together. Press it around the top to form a neat edge, and press any cracks sealed again. Prick it all over with a fork.
Bake the crust for 12 to 15 minutes, until lightly browned.
Make the Filling & Bake the Pie:
1/2 cup sugar
3 tablespoons soft unbleached (pastry) flour
1/2 teaspoon salt
1/2 teaspoon cinnamon
1/4 teaspoon finely grated nutmeg
2 cups rich milk or light cream
3 tablespoons unsalted butter
4 large eggs
2 teaspoons vanilla extract
In a medium mixing bowl, mix the sugar, flour, salt, cinnamon, and nutmeg until very well blended.
Put the milk and butter into a small pot or microwave-proof bowl, and heat slowly and gently until the milk is steaming but not bubbling, and the butter is melted.
Whisk the eggs into the flour mixture, one at a time, until smoothly blended. Begin whisking in the milk, a few tablespoons at a time, until the mixture is smoothly liquid. Whisk in the remaining milk.
Pour the filling into the prepared pie crust. Put it into a shallow pan of water, and place both in the oven. Heat the oven to 350°F. Bake the pie for 50 to 55 minutes, until it will juggle slightly in the middle, but is set.
The pie should cool thoroughly and finish setting for at least several hours to overnight before serving.
Last year at this time I made Mashed Rutabaga & Celeriac.
Read More..
The technique for making the pastry is quite unorthodox. The result is not a typical flaky crust, but one with a delicate shortbread-like texture. I found it a bit difficult to roll thin enough; the crust wanted to break up as I transferred it to the pan. On the other hand, it was very easy to press it back together again, and I dont think overhandling is as big a problem as it is with regular pastry. I adapted the technique from a recipe by Jane Grigson.
6 to 8 servings
1 hour 30 minutes - 30 minutes prep time
Make the Crust:
1/2 cup unsalted butter
1 teaspoon sugar
1/4 teaspoon salt
1 3/4 cups soft unbleached (pastry) flour
Preheat the oven to 400°F
Melt the butter with the sugar and salt, over very low heat (or in the microwave). Mix in the flour, until it no longer shows any white, and a crumbly dough is formed.
Roll it out on a piece of parchment paper to fit a 9" pie plate, and transfer it to the pie plate. Be sure to roll it out as thinly as you can.
The dough is rather crumbly, so will likely need a bit of patching to go back together. Press it around the top to form a neat edge, and press any cracks sealed again. Prick it all over with a fork.
Bake the crust for 12 to 15 minutes, until lightly browned.
Make the Filling & Bake the Pie:
1/2 cup sugar
3 tablespoons soft unbleached (pastry) flour
1/2 teaspoon salt
1/2 teaspoon cinnamon
1/4 teaspoon finely grated nutmeg
2 cups rich milk or light cream
3 tablespoons unsalted butter
4 large eggs
2 teaspoons vanilla extract
In a medium mixing bowl, mix the sugar, flour, salt, cinnamon, and nutmeg until very well blended.
Put the milk and butter into a small pot or microwave-proof bowl, and heat slowly and gently until the milk is steaming but not bubbling, and the butter is melted.
Whisk the eggs into the flour mixture, one at a time, until smoothly blended. Begin whisking in the milk, a few tablespoons at a time, until the mixture is smoothly liquid. Whisk in the remaining milk.
Pour the filling into the prepared pie crust. Put it into a shallow pan of water, and place both in the oven. Heat the oven to 350°F. Bake the pie for 50 to 55 minutes, until it will juggle slightly in the middle, but is set.
The pie should cool thoroughly and finish setting for at least several hours to overnight before serving.
Last year at this time I made Mashed Rutabaga & Celeriac.
Wednesday, May 14, 2014
Six years and counting
It was in March 2006 that I gingerly typed out the first few words of this food blog. I had no clue what this would turn into. I wasnt even aware that what I was doing would be called foodblogging - though it does seem to be the obvious term for it now.
Read More..
I got connected with the other early food bloggers from India and abroad. Some of my favourite blogs in my first year of blogging were Mahanandi, Sailus Food, One Hot Stove, Fat Free Vegan and Whats For Lunch Honey. Over the last few years, food blogging became quite a phenomenon, with every home cook documenting his / her recipes (and why not?) - so much so, that at last count, our Bangalore Food Bloggers Group on Facebook has 75 members. 75 foodbloggers in Bangalore city alone (!!), and may be many more who arent a part of the group.
Ive managed to meet quite a few food bloggers in the last six years and some of them are my dearest friends today, friendship tempered by the love of food. Ive gone on long blogging breaks, the audience has possibly changed but theres something thats always brought me back. Its quite impossible to abandon a baby like that.
Saffron Trail was recently nominated in the category of Best Healthy Cooking Blog in the Homies 2012 and it was an honour to be nominated with my blogger batch mates like Susan from Fat Free Vegan. Also, words of appreciation from people who try my recipes, a pat on the back from local publications, chefs and fellow foodies respecting you for the persistence in doing something you are passionate about-all of the above keeps me going in making this blog a better place for food lovers to visit.
I think Im finally finding my blogging groove back so do keep checking back for more from my kitchen (and garden).
Tuesday, May 13, 2014
Secret Underwater Pomegranate Trick
 This is a short, but hopefully useful demo for how to remove all those pomegranate kernels without a big mess. These are great on fall/winter salads, soups, and desserts.
Monday, May 12, 2014
Halibut steaks Lúðubuff
Heres one way to prepare my favourite fish.
1 1/2 kg. Halibut, whole (or turbot, sole or other flat fish if you cant get halibut)
4 tbs flour
2 tsp salt
1/3 tsp ground pepper
150 g oil, butter or margarine
100 g onion
Take one small, whole halibut. Cut off the head, tail and fins. Scrape off the slime and loose scales under cold, running water. Cut the fish into slices, about as thick as your thumb is wide. Mix together flour, salt and pepper. Coat the slices with flour mixture and fry in the hot fat until done (3-4 minutes on each side). Remove from the pan and arrange the steaks on a serving dish. Slice the onions and brown in the fat, remove and put on top of the fish. Pour some water on the frying pan, roll it around and pour over the fish. Serve with cooked potatoes, green salad and lemon wedges.
-Try grilling the fish steaks: cut into large cubes and thread onto skewers with onion pieces, fresh mushrooms and pieces of red bell pepper (capsicum).
Read More..
1 1/2 kg. Halibut, whole (or turbot, sole or other flat fish if you cant get halibut)
4 tbs flour
2 tsp salt
1/3 tsp ground pepper
150 g oil, butter or margarine
100 g onion
Take one small, whole halibut. Cut off the head, tail and fins. Scrape off the slime and loose scales under cold, running water. Cut the fish into slices, about as thick as your thumb is wide. Mix together flour, salt and pepper. Coat the slices with flour mixture and fry in the hot fat until done (3-4 minutes on each side). Remove from the pan and arrange the steaks on a serving dish. Slice the onions and brown in the fat, remove and put on top of the fish. Pour some water on the frying pan, roll it around and pour over the fish. Serve with cooked potatoes, green salad and lemon wedges.
-Try grilling the fish steaks: cut into large cubes and thread onto skewers with onion pieces, fresh mushrooms and pieces of red bell pepper (capsicum).
Sunday, May 11, 2014
Fish Tacos

If you have not yet tried a fish taco and you think it sounds a little strange, try these and I am certain that you will become a fan. This technique is also a great way to incorporate more fish into the weekly dinner rotation and, because they are fried chicken tenders, chances are your kids will like them too!
Fish tacos are frequently topped with crunchy cabbage and thinly sliced red onion. The combination of the texture of the cabbage and bite of the onion is a great combination with the fried fish. I thinly shredded 1/2 cabbage and added it to a bowl with 1/2 red onion, also sliced thin. The sweetness of Mango is delicious accompaniment as well and, since they were ripe and ready to eat at the grocery store yesterday, I decided to add 1 cubed mango to the bowl with the cabbage and red onion. Next, the juice of 1 lime, a tablespoon of honey drizzled over the top, a bit of olive oil and salt and pepper. Combine well and chill until it is time to assemble the tacos.

For the star of the fish tacos, the fish, I used 2 Tilapia filets. They work perfectly here because they are a mild, firm, white fish, but if you have another you prefer such as cod, grouper or even catfish, feel free to substitute. I set up a breading station with flour, 1 beaten egg and panko bread crumbs. Tilapia filets have a natural score down the midde which makes them easy to cut in half creating a more managable "fish finger" to fry. Dredge each fish finger in the flour, then dunk in the beaten egg, and finally coat each piece with the panko bread crumbs. Fry in about an inch or two of hot oil for about 5 minutes or so on each side or until they are golden brown and crispy. Drain on a paper towel and immediately season with sea salt.
When it is time to assemble the tacos, warm a flour tortilla over a gas burner set to low until warm, or in a dry warm frying pan. Place the crispy fried fish on the flour tortilla and top with the cabbage, red onion and mango slaw. If you like hot sauce, now is the perfect time to experiment. I like the smoky heat of chipotle hot sauce with the sweetness of the mango in the slaw, so thats what I used. You can certainly substitute any hot sauce you like or even use pickled jalapenos, jarred salsa or homemade pico de gallo as well. A dollop of sour cream finishes it off.
I would enjoy hearing other variations you have made of fish tacos or, if this is your first time trying them, let me know how it turned out . Send in a photo, Id love to see!
Saturday, May 10, 2014
Oatmeal Prune Cookies spiced with Chai Masala
Hello! The line "Im finally back after a long break" seems to be my opening line for every post in the last few months. A new kitchen, a big oven, nurturing my own little vegetable patch and still I am looking for the inspiration to be blogging regularly.
P.P.S
It will be nice to meet up the Bangalore Foodbloggers, over food (what else?!) and discuss food (no surprises there) this Saturday once again as we have our first ever Mega Bangalore Food Bloggers meet up. We have a group on Facebook, so if you are a foodblogger who blogs from Bangalore and you arent a part of the group yet, please leave a note in the comments, so we can send you an invite.
Read More..
Last month, Aparna was in Bangalore and some of the Bangalore food bloggers met up over a scrumptious buffet lunch. Much fun was had. Lots of pictures taken. And of course the food critic role played.
 |
| Sweet Potato Cupcakes |
For our first Diwali in the new house, I made the 7 cup cake, a shortcut mixture and Bakerellas sweet potato cupcakes with chocolate ganache. My version of shortcut mixture was puffed rice (pori) crisped up with tempering of chillies, curry leaves, asafoetida, mustard seeds, peanuts and fried gram dal. To this I added store bought shankarpala, khara boondi and omapodi (sev). This is the best I could manage when my mildly over-inquisitive son didnt even have the school to keep him engaged.
Last weekend, I cooked for a crowd of 9 people (umm okay, not crowd but group). While I was toying between a Mexican and a Lebanese menu, the friends demanded Tambrahm food, politely put as food you cook regularly or food you cook well! So I set aside all my hopes of winning compliments as a truly world-class vegetarian chef and sat down to draw out a Tambrahm menu, as many items as I can possibly make all by myself with a 3 year old hanging around me dangerously!
The menu finally turned out to be :
Kosumalli / Kosumbari (with grated carrot, cucumber, gooseberry)
Crispy Bhindi Raita (crisped in the oven, no deep frying)
Arachuvitta sambar with small onions & carrots
Baby Potato roast Chettinad style flavoured with fresh dill
Yennai Kathrikkai - stuffed baby eggplants ( Google docs link to a friends recipe notes)
Vazhakkai Podimaas
Store bought Banana Chips
Rice
Mini chocolate cupcakes with chocolate ganache - Adapted from Dan Lepards Easy chocolate cake recipe
Now that Im done updating you, heres what todays blogpost is about. My friend Preethi sent me a few baking trays that included this beautiful cookie mould tray in which one can bake x-massy snowflake imprint cookies. I couldnt wait to try baking cookies in this one. The recipe is adapted from the cover of on of the Wilton cookie trays. These imprint cookies will be better with all purpose flour or whole wheat flour rather than chewy oatmeal cookies, so by all means you can bake these cookies on a plain cookie tray dropping spoonfuls of dough or flattening balls of dough on your palm and baking them until golden. The addition of oats makes these chewy and somewhat soft, perfect for your teething babies or aged parents who cant bite very hard biscuits. If you want these crisper, you can pat them thinner and bake for a few minutes more.
The addition of chai masala is my own twist to a traditional American recipe for the only way I eat cookies is with my chai, and this way they will complement each other beautifully. You could substitute ground cardamom, ground cinnamon or a mix of your favourite spices.

The addition of chai masala is my own twist to a traditional American recipe for the only way I eat cookies is with my chai, and this way they will complement each other beautifully. You could substitute ground cardamom, ground cinnamon or a mix of your favourite spices.
Printable version of recipe
Oatmeal Prune cookies spiced with Chai Masala
Oatmeal Prune cookies spiced with Chai Masala
Makes 12-14 cookies
Time taken Under 30 minutes
3/4 cup oats
1 cup all purpose flour + a few tbsp on the side in case required to bind dough
1/2 tsp baking powder
Pinch of salt
1 tsp Chai Masala ( Everest or any other brand)
1 tsp instant coffee powder (optional)
1/4 cup butter
1/4 cup brown sugar
1/4 cup sugar
1 tsp vanilla extract
1 egg
3 tbsp finely chopped prunes or use raisins
Handful of finely chopped walnuts (optional)
2 tbsp milk
2 tbsp milk
Preheat oven at 180C.
In a large bowl, cream the butter and sugars until light and fluffy.
Add the vanilla extract and egg. Beat some more.
Run the oats for a few seconds in the small jar of your mixer until coarsely powdered.
Run the oats for a few seconds in the small jar of your mixer until coarsely powdered.
Add the oats, flour, salt, baking powder and chai masala.
Stir well it all the dry ingredients are incorporated into wet ingredients. Add the nuts and prunes in the final stage of mixing.
Line a cookie sheet with grease proof paper.
Divide dough into 12-14 balls adding some of the reserved flour to the dough if too sticky and tough to handle.
Flatten using fingers dipped in milk and place on cookie sheet leaving adequate space in between cookies as they will expand while baking.
Bake for 10-12 minutes. Remove and cool on a wire rack. Store in airtight container once cooled.
I used a cookie sheet with moulds, so I pressed the dough balls into each of the shape-moulds to get pretty snowflake imprints on them.
Thank you Preethi for this sweetest housewarming gift. Check out her food blog here
Thank you Preethi for this sweetest housewarming gift. Check out her food blog here
P.S.
If you like reading my blog and you are on Facebook, please show some love to my blog page there : http://www.facebook.com/SaffronTrail
If you like reading my blog and you are on Facebook, please show some love to my blog page there : http://www.facebook.com/SaffronTrail
P.P.S
It will be nice to meet up the Bangalore Foodbloggers, over food (what else?!) and discuss food (no surprises there) this Saturday once again as we have our first ever Mega Bangalore Food Bloggers meet up. We have a group on Facebook, so if you are a foodblogger who blogs from Bangalore and you arent a part of the group yet, please leave a note in the comments, so we can send you an invite.
Friday, May 9, 2014
In search of a good vegetarian Stroganoff Mushroom Stroganoff
I have been glued and addicted to watching Masterchef Australia on Star World. It is the classiest reality show to be aired on Indian television, in my humble opinion, of course. Trolls, please excuse. Whats a vegetarians interest in watching this predominantly meat based show, you may wonder. It is the passion for food, the techniques, the presentation, the tips given by the stalwarts in the field, that make this show very endearing to the foodie in me.
When a couple of weeks ago, they made the Beef Stroganoff in an elimination challenge, I liked the way the dish had layers of flavour to it. I just had to find the right substitute to the beef and serve it with some plain steamed rice or spaghetti.
Also, I had to look around for authentic paprika, which is essential to this Eastern Europen dish. Some of the Indian spice brands sell spice bottled as paprika, but it is essentially just chilli powder. Finally, I found this real paprika, in the Waitrose aisle of Hypercity. Pricey, but authentic and the husband egged me on to put it our trolley and take it home.
Here are some of the recipes that I found good to try out -
Mushroom Stroganoff with mustard and chive mash from The Vegetarian Society
Rose Eilot’s Mushroom Stroganoff from The Guardian
Vegetarian mushroom stroganoff from Mushrooms.Canada website - which is the one I adapted.

I had some fresh button mushrooms, dried oyster mushrooms and another variety of large sized dried mushrooms that our friend had gotten us from Bangkok. Combining the three, I had a good mix of flavours and textures to proceed with a recipe.

My Version of Mushroom Stroganoff
Adapted from Mushrooms.canada
Serves 3-4 people

Ingredients
1/2 cup of dried oyster mushrooms or any other dried mushrooms
1 tbsp olive oil
2 cloves finely minced garlic
1 large onion, finely chopped
1/2 tsp of fresh thyme leaves or 1 tsp of dried thyme
1/2 tsp of fresh marjoram or 1 tsp dried marjoram (optional)
10-12 sliced button mushrooms (upto 200 grams)
1/3 cup tomato puree
1 vegetarian stock cube (I used Maggi seasoning cubes)
30-45 ml of brandy or sherry or red wine
1 tsp English mustard
1 tsp paprika (substitute with Kashmiri Chilli powder if you cant find paprika)
1/2 cup sour cream
1 tbsp cornstarch
1 tsp salt or to taste
To serve
3-4 cups of steamed rice or Spaghetti cooked according to instructions and tossed in olive oil with some dried or fresh herbs
Preparation
First, wash the dried mushrooms under running water and then soak in 1-2 cups of hot water, cover the vessel and keep aside for 10 minutes. You can either snip the soaked mushrooms under the water or drain them and chop into even sized pieces. Do NOT throw away the water in which they were soaked as it is full of flavour and we will be using it later to build the sauce of the stroganoff.
Directions
- In a heavy bottomed pan, heat the olive oil. Add the onions, garlic, fresh thyme and marjoram. Saute on medium heat, till they are soft.
- Add the chopped fresh and rehydrated mushrooms, stir well to mix with the aromatics. Let this cook on medium flame till nearly done, say 5-7 minutes.
- Add the tomato puree and cook it off for 2-3 minutes on high flame.
- Add the stock cube, the water in which the mushrooms were soaked. Cover and let this simmer till the mushrooms are soft, for about 5 minutes.
- Next, add the brandy, mustard, paprika. Make a slurry of cornstarch in a little cold water and add it to the simmering stroganoff along with the sour cream. Add some water if you think the sauce is drying out. Add salt and let this simmer for 5 minutes until all the flavours infuse into the mushrooms.
- The final dish should be a stew of very flavourful mushrooms in a good quantity of thickish sauce that you can eat the rice / spaghetti with.
I was tasting stroganoff for the first time and I quite loved it. I had prepared this in the afternoon and by dinner time, the flavours had intensified. It went perfectly well with the mild spaghetti. The husband relished it thoroughly too. Will I be making this again? You bet, I will.
Making sour cream at home
Collect the cream from the top of boiled and cooled milk for 3-4 days and storing it in freezer. Once you have half a cup of cream, remove this in a cup and add a tsp of yogurt to it and mix well. The cream will sour in 5-6 hours, depending on the weather. Keep it for longer if the weather is quite chilly. Refrigerate the sour cream in an airtight container for a day or so, until use or in freezer if you are not going to use it soon.
Shopping for ingredients in Hyderabad
- Dried oyster mushrooms - available at Spar, Begumpet - for around Rs.20 a pack. Look in the Noodles / Chinese ingredients aisle
- Real paprika - Waitrose shelf in Hypercity, Inorbit Mall or you can buy the Keyas Kashmiri Paprika
- Fresh Thyme, Marjoram - Spar, Begumpet ; Dried herbs in any Fabindia or Keyas brand in most supermarkets
Thursday, May 8, 2014
Sausage and Lentil Soup

Carrabbas Sausage and Lentil Soup
Copycat Recipe
Serves 6-8
1 tablespoon olive oil
1 onion, chopped
4 celery stalks, sliced
6 ounces smoked sausage (such as kielbasa), coarsely chopped
4 cups chicken or vegetable stock
4 cups water
2 cups green lentils
1 strip (3 inches long) orange rind
1 teaspoon crumbled dried marjoram
1 teaspoon crumbled dried savory
3 carrots, peeled and sliced
2 potatoes, peeled and diced
salt and pepper, to taste
In large heavy saucepan, heat oil over medium heat; add onion and cook for5 minutes, stirring occasionally. Add celery and sausage; cook for 5 minutes, Stirring occasionally. Add stock, water, lentils, orange rind, marjoram and savory; bring to boil Reduce heat, cover partially and simmer for 30 minutes. Add carrots and potatoes; cover partially and simmer, stirring occasionally, for 35 minutes Or until lentils are tender. Discard orange rind. Season with salt and pepper to taste.
Wednesday, May 7, 2014
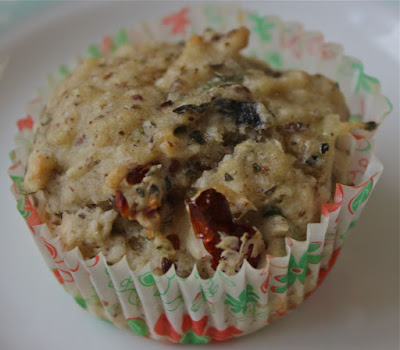
Eggless Savoury Muffins with Sun Dried Tomatoes Cheese and Olives

Its vacation time at the play group, which means the little boy, when not up to any nefarious activities, is hanging around the kitchen, making puppy eyes at me, saying "Mummy, I want something to eat", which is not entirely a bad thing. He likes to eat most (if not all) the stuff I make, showers me with compliments for my cooking skills and helps rearrange the drawer that holds all the ladles and spoons to a fine mess.
I try to keep homemade stuff like muffins, healthy banana-oatmeal based cookies, cheese squares, cubed watermelon and cucumber and some of his favourite things around for the mummy-i- am-hungry times. Before you jump to the conclusion that I only give homemade-healthy stuff to my son, let me confess that I also give him store bought treats like Nilgiris tiny drop cookies, lemonade, chocolates and chikki. Everything in moderation.
So, dear reader, tell me what you are doing with your kids in the vacation. What treats? What games? What activities? It would be lovely to hear from you.
Coming to these savoury muffins, they are perfect little bites of wholesome goodness. Flaxseed meal, sun dried tomatoes, cheese and black olives make these utterly healthy and full of fibre and protein.
My son has been crazy over olives, ever since he started eating solid foods. I think, thats one of the genetic traits passed on from his dad, who can go through a bottle of olives in a couple of days. With an olive-loving family like this, I looked up a few savoury muffin recipes in the Muffin Bible with olives in them. Adapted a couple of recipes to come up with this healthier option.
If you follow Saffron Trail on Facebook, you might have seen my notes on making sun-dried cherry tomatoes to put the 40 C Bangalore summer to good use. 4 days and you have the most beautiful salty, tangy, sweet, crispy bits of tomatoes that have captured the sun and boosted their flavour ten-fold. I used a handful of these home dried tomatoes here.
Recipe for Savoury muffins with Sun dried tomatoes, cheese and olives
Time taken - under 20 minutes
Makes 12 small muffins or 9 medium sized muffins
Ingredients
1/2 cup all purpose flour (maida)
1/2 cup whole wheat flour (atta)
150 grams of cheddar cheese or 3 Amul cheese cubes, grated
1 tsp baking powder
1/2 tsp salt
1/3rd cup of sun dried tomatoes
10 black olives, chopped
10-12 fresh sage leaves, finely chopped (or any other fresh herbs like basil or thyme)
1 tsp dried basil
1 tsp dried oregano
2 tbsp flaxseed meal
1/4 cup hot water
2 tbsp olive oil
1 tbsp salted butter + pinch of crushed dried basil
Directions:
Preheat the oven at 200C [Start oven, take temp dial to 200 and time dial to 10 minutes. At the end of 10 minutes, the oven is preheated. You will have to then set the timer as per the baking time, which is around 10 minutes here]
Line a 12 cup muffin tin with paper liners or use individual silicone cupcake moulds, that will fit in a smaller oven.
Mix all dry ingredients in a large bowl with a fork.
In a measuring jug or another bowl, whisk the flaxseed meal with hot water and olive oil till frothy. Add enough water to this to make a total of one cup (which is why doing this is a measuring jug is easier).
Add this to the dry ingredients and stir gently with a fork to bring ingredients together. Too much beating or vigourous mixing will result in hard muffins.
[You can use egg instead of the above flaxseed-hot water. Beat 1 egg, add oil and add enough water at room temperature to make one cup and proceed with the recipe]
Using a spoon, evenly distribute batter between 9 or 12 muffins cups.
Bake for 10-12 minutes at 200C until a skewer comes out clean.
Melt the butter in a small microwave safe bowl for 20 seconds. Add the basil to it. Brush this on the muffin tops once they are out of the oven. Not only does this add a buttery flavour but also helps them keep moist. This is a neat trick to add that buttery taste without using any butter in the baking.
Notes:
You could even bake these in a mini muffin tray to yield 20-24 bite sized muffins for a tea party.
Feel free to change the favours - use thick pizza sauce, more fresh herbs and mozzarella cheese to make Pizza flavoured muffins. Grated carrot, pepper and cheddar is a lovely combination as well. Meat eaters can add crisped bacon bits to the batter. The options are quite endless.
Not just for kids, these muffins that are ready in a jiffy are the perfect accompaniment to a soup for a light meal, even for adults. You could make them spicier with chopped pickled jalapeños, or chopped greeen chillies and ground black pepper. Make a couple of batches and freeze / refrigerate them for breakfast on the go, for a weekday
Shopping Guide:
Ready ground flaxseed is available in most stores in Bangalore. I buy mine from Nilgiris or Town Essentials - and refrigerate it as it can go rancid quickly.
Tuesday, May 6, 2014
Saraswat Lunch Menu from Rasachandrika
Regional Indian cooking has such variety that its mind-boggling. Every culture has had its cookbook bible that it trusts to preserve the heritage and authenticity - Meenakshi Ammal is one such great lady who put down traditional Tamil cuisine in three volumes. Such books are not only wonderful to discover in our kitchens the kind of food that is hardly ever available in restaurants, but also to give a great insight into the other cultures in our country. I can say the same about some of the food blogs :) Rasachandrika, written by Ambabai Samshi is one such cooking bible for Saraswat community - and I was glad to buy it a few months ago - this showcases Chitrapur Saraswat cooking.
What I loved about this book is the emphasis on vegetables and the numerous ways of preparing each one, not to mention the simplicity of ingredients and directions. Suppose you are stuck for how to prepare snake-gourd for example, just open the chapter on this vegetable and see which recipe you want to prepare. The quantities for most veggie recipes will be good for small families.
This is how I used up the cut beans, kovakkai and brinjal - selected a dal from the dal section and I had a whole Saraswat meal ready.
Menu

Beans Talasani

Kovai Butti - The masala used for this curry, I found very similar to the one we grind for mor kozhambu. This was probably the best tasting kovakkai (ivy gourd) dish Ive ever had.
Recipe for Kovai butti
1/4 kg tender kovai
1 tbsp ground nut oil
1/2 tsp mustard seeds
pinch of asafoetida
salt and jaggery to taste
small ball of tamarind
5 red chillies*
1 tsp coriander seeds*
1/2 tsp black gram dal*
a few fenugreek seeds*
4-5 garlic cloves*
1/4 coconut gratings - roasted
*fry in a little oil
Wash and slice the kovai into rounds.
Heat oil, temper the mustard seeds and asafoetida. Add sliced kovai, salt, jaggery - stir well, sprinkle water, cover and cook till tender.
Grind the coconut, fried spices and tamarind to a paste, adding some water if required.
Add this paste to cooked kovai and let it simmer till nearly dried out.

Brinjal bhareet - A very simple dish made by roasting and mashing a large eggplant. The recipe called for adding green chillies, ginger and coconut as is into the mash, I preferred to temper them in oil before use.
Recipe for Bhareet
1 large brinjal
Oil to coat the brinjal - 2 tsp or so
handful of coconut gratings
chopped coriander leaves
6-7 green chillies
1 small piece ginger
salt to taste
3-4 tbsp curds or lemon juice
Apply oil over brinjal and roast on open flame turning on all sides, till completely soft inside. When cool, peel and slice checking for worms. Mash with a fork.
Crush the chopped chillies, ginger, coriander leaves and salt, add to mashed brinjal with coconut gratings. Mix in curds or juice of half lemon in the end.

Dali tuaykadi - One of the traditional lentil preparations, the fresh ground masala gave it a unique taste.
Recipe for Dali Tuaykadi
1/2 cup tur dal
1 cup water
1 small marble sized tamarind / 3-4 kokum rinds / 1/2 raw mango cubed
To fry in oil -
1 tbsp grated coconut
3 red chillies
6-8 cloves garlic
6-7 pepper corns
1/2 tsp cumin seeds
1/4 tsp turmeric powder
salt to taste
Pressure cook dal with turmeric and water with soft.
Mash dal well with salt and tamarind juice and simmer.
Grind the fried ingredients to a paste, add to simmering dal and boil.
Garlic is optional.
Limited preview of the book available here
Sunday, May 4, 2014
Thakkali Kulambu Tomato Gravy for Idli and Dosa and Dosa Recipe

This is my moms recipe specially prepared as side dish for Dosa and Idly.
Ingredients
Tomatoes diced-1cup
Onion medium chopped-1/4cup
Garlic clove sliced-2
Green chilly slit-2
Coconut paste/ Milk-1cup
Chilly powder-1tsp
Kuzhambu powder-1tbsp
Turmeric-1/4tsp
Mustard seeds-1tsp
Salt to taste
Sesame/ Gingelly oil required
Method
Heat oil in a kadai, add mustard seeds when crackles add the onions, garlic and green chilly, fry for few minutes. Add the tomatoes and fry till they are mashed. Now add the chilly powder, kuzhambu powder, turmeric and salt, add enough water, cover with lid and simmer for 8 mins. Finally add the coconut paste, bring to boil and serve hot with dosa or idly.
Dosa
Ingredients
3 cups parboiled rice
1 cup white Urad Dal (white lentils)
Salt to taste
Method
Wash and soak the urad dal and parboiled rice in water for 6 hours.
First make a smooth batter of urad dal in a Wet grinder or Blender, next make a smooth batter of rice. Combine the rice batter with the urad dal batter in a big bowl and add salt. Mix well and keep the batter to ferment overnight for minimum 12 hours. This is both Idly and Dosa batter. To prepare Dosa, heat a tawa smear 1tsp of oil. When tawa is hot, take a ladle full of batter and spread from the center to the corner in circle motion (it should be like pancakes). Smear with 1tsp of oil around dosa. Cook dosa on both sides and serve hot with Thakkali Kuzhambu/Sambhar/Chutney
Saturday, May 3, 2014
Aalo anday ka korma
Aalo anday ka korma

Ingredients
- Baby potatoes 250 gm peeled and boiled
- Eggs 6 boiled
- Chili powder 2 tsp
- Coriander powder 2 tsp
- Turmeric ¼ tsp
- Ginger garlic 1 tsp heaped
- All spice ½ tsp
- Yogurt 1 cup
- Mace ¼ tsp grinded
- Nutmeg ground ¼ tsp
- Kewra water 1 tsp
- Oil ½ cup
- Brown onion ground 4 tbsp
- Salt 1 tsp heaped
Method
- Boil and peel baby potatoes, boil and peel eggs.In a bowl beat yogurt mix with salt, chili powder, coriander powder, all spice, turmeric, ginger garlic paste, ground nutmeg and mace .
- Heat oil , add yogurt mixture with ¼ cup water, fry well add 1 cup water for gravy .When the mixture begins to boil add boiled potatoes and egg.
- Cook till the gravy thickens, lastly add kewra,serve with chopped ginger and chopped coriander leaves.
Friday, May 2, 2014
French and Garden Sorrels

When we go out and tramp around the garden searching desparately for signs of spring (Okay, its finally here!) I always get a smile from my patch of sorrel. Perky little 2" leaves have been there since the snow melted, just waiting for a little warmth to really get growing. As such, sorrel will be one of the first green vegetables picked from the open garden.*
This is the first year I expect to pick any of it. I planted it last year, and thought it had better get established before I started picking, although it grew quickly and well. Im not sure whether I have French or Garden sorrel since I grew mine from a packet a friend gave me - which was labelled in Russian! They are two quite similar species, rumex scutatus (French sorrel) and rumex acetosa. French sorrel may be little the more tender and mild of the two, but they can be used interchangeably.
While sorrel is easily found as seed or young plants for the garden, it seems strangely absent from groceries and markets. I hope it can be found in some farmers markets, but at any rate anyone with even a small garden not necessarily dedicated to growing vegetables can grow sorrel. It has a lot of relatives, many of which are highly successful weeds (rumex acetosella, grrrrrrr!) and it retains a weed-like robustness and tolerance for different soils that makes it an easy plant to grow. However, unlike its more weedy relatives, it doesnt spread by runners but stays in a nice clump. I would recommend removing the flowering tops before they go to seed though, or it will be everywhere. Its also a relative of spinach, rhubarb and buckwheat. The leaves are rather spinach-like, with a tart lemony flavour reminscent of rhubarb, although not that sour.
Tender young leaves can be added to salads, made into sauces for eggs, fish, or chicken, put in soups and used to liven up the last of the previous years potatoes.
Its generally regarded as best in the spring, because the leaves are most tender and mild when grown in cool, moist weather. However, fresh young leaves could be used throughout the summer if you really wanted to. Perhaps a better plan is to give them a rest during the hot days of summer, then start picking again in the fall when things cool off.
If you dont have an herb or perennial vegetable bed in which to plant sorrel, it could go into a perennial flower bed quite easily. The leaves are a mid-green arrow shape, a bit coarse but not unattractive, and a small patch would make a good neutral background to more showy plants. A spot a foot around would be sufficient, although if you like it you will want more than that. Along with Welsh onions or walking onions**, sorrel is an exciting find in early spring when we are longing for fresh green things from the garden and worth finding space for, in even a very small garden.
* I wrote this a couple of days before I wandered out with my camera, planning to photograph the patch (which I did. See: photo) and pick some (which I didnt. See: photo). It was the first thing picked, all right. The deer picked it. Those bastards. I thought they werent getting in any more. I thought we had an agreement: they wouldnt eat my veggies, and I wouldnt eat them. So much for that.
** Seen in the photo next to the sorrel. Apparently the deer dont care for them. Hu-bloody-rray.
Thursday, May 1, 2014
Blue Plate Alert Diner Style Patty Melt

I can not definately recall the first time I had a Patty Melt, but I think it was at the lunch counter at Pine Ridge Golf Course where I worked when I was in high school. It is an old fashioned diner meal and Im not sure how many still make it. I must admit that I usually turn to the Patty Melt when I am craving a burger but I dont have a bun. I generally always have some good crusty bread on hand, though not always rye which is traditional. Such was the case last night.
A Patty Melt is basically a cooked hamburger placed between two pieces of bread (usually rye, though I used sour dough) and topped with swiss cheese, grilled onions and thousand island dressing. The hamburger sandwich is then buttered on both sides and grilled as you would a grilled cheese or panini. It is fantastic and a great alternative to the usual burger on a bun. I made the thousand island dressing by combining 2 tablespoons of mayonnaise, 1 tablespoon of ketchup, 1 tablespoon of sweet pickle relish, a dash of Worcestershire sauce, a pinch of garlic powder, a pinch of cayenne and salt and pepper. For those of you who remember, it is similar to Big "H" Sauce, which is also much like Big Mac sauce. It is also delicious on salad, fabulous as a dipping sauce for steamed or boiled shrimp and also quite tasty with onion rings (particularly if you also add a spoonful of horseradish).
The salad I had was simple mixed spring greens which I washed thoroughly (despite the container saying it was ready to eat) and dried completely with the salad spinner. A simple dressing of 2 parts extra virgin olive oil to 1 or 1 1/2 parts red wine vinegar makes it the perfect palate cleansing side to this Diner Style Patty Melt.
Wednesday, April 30, 2014
Snap Peas with Beef Onions
Stupidly fast and simple, but very nice with those delish snap peas! Put some rice on to cook just before you start this to give it a bed to rest on once it is ready. (Or start it 20 minutes before you start this if it is brown rice.)
2 servings
30 minutes prep time

4 cups snap peas
2 onions, greens and bulbs
1 tablespoon mild vegetable oil
250 grams (1/2 pound) ground beef
3 tablespoons hoisin sauce
1/4 cup water
Wash and trim the snap peas. Cut the greens off the onions, and chop the greens. Set them aside. Peel and chop the onions, and set them aside.
Heat the oil in a large skillet. Add the onion and ground beef and cook until browned, stirring constantly and breaking up the ground beef into fairly small pieces. Add the hoisin sauce and water. Add the peas and continue cooking and stirring, until the water is absorbed and the peas are bright green and crisp. Add the onion greens and stir them in until they are well wilted. Thats it; there you go.
Last year at this time I made Vegetable Fried Rice. Hey! Make extra rice and have that tomorrow. Thats what I did!
Read More..
2 servings
30 minutes prep time
4 cups snap peas
2 onions, greens and bulbs
1 tablespoon mild vegetable oil
250 grams (1/2 pound) ground beef
3 tablespoons hoisin sauce
1/4 cup water
Wash and trim the snap peas. Cut the greens off the onions, and chop the greens. Set them aside. Peel and chop the onions, and set them aside.
Heat the oil in a large skillet. Add the onion and ground beef and cook until browned, stirring constantly and breaking up the ground beef into fairly small pieces. Add the hoisin sauce and water. Add the peas and continue cooking and stirring, until the water is absorbed and the peas are bright green and crisp. Add the onion greens and stir them in until they are well wilted. Thats it; there you go.
Last year at this time I made Vegetable Fried Rice. Hey! Make extra rice and have that tomorrow. Thats what I did!
Tuesday, April 29, 2014
MAX’S PAN SEARED WILD ALASKA KING SALMON
 |
| Featured in the photograph: One Red and one White Wild Alaska King Salmon fillet... |
Prep: 5 Mins. |
Pan-Sear: 13 to 15 Mins.
Posted by Sandra
INGREDIENTS
***Remoulade Sauce:
1/3 cup ketchup (Max only uses Heinz)
1/3 cup mayonnaise
¼ teaspoon garlic powder
Ground pepper, to taste
½ teaspoon freshly lemon juice
***Salmon Fillets:
4 (8 oz.) boned, skin-on king salmon fillets, 1-1/2” thick (red and/or white)
olive oil
¼ teaspoon garlic powder
sea salt and ground pepper, to taste
--1/2 fresh lemon, cut into 4 wedges for serving
***Max’s Dinner included:
--2 cups of steamed rice, prepared according to package directions
--Ginger/soy sauce (Max’s favorite is the House of Tsang)
--2 ripe roma tomatoes, sliced
--Fresh sprigs of parsley for garnish
METHOD
Make ahead: First, the steamed rice. Also, separately prepare the remoulade sauce by whisking all ingredients in a small decorative bowl, and place in refrigerator for flavors to meld.
Meanwhile, when the steamed rice is about halfway done, heat the olive oil in a large nonstick skillet over medium-high heat. Brush the entire flesh side of salmon fillets with olive oil, and equally season them with garlic powder, sea salt; plus, rather generously with ground pepper. Place the salmon fillets into hot skillet presentation side down (flesh side), and sear, uncovered, for about 4 to 5 minutes without disturbing, until golden brown. Reduce heat to low, turn salmon fillets over so they are skin-side down, cover, and cook for 7 to 10 minutes, just until fillets are cooked through and flake easily with a fork.
To serve, place a salmon fillet on each of the four serving plates, and squeeze a wedge of fresh lemon over each of them. Place a mound of steamed rice on each plate, along with slices of fresh plum tomato, and a sprig of parsley for garnish. Place the ginger/soy sauce on the table for individuals to season their rice, as desired. Don’t forget the remoulade sauce to serve as an accompaniment for the salmon fillets. – Enjoy!
~~~~~~~~~~~~~~~~~~~~~
Tip: Cooking times may vary, depending upon thickness of salmon fillets. The ‘general rule of thumb’ is 10 minutes total per 1" thickness of fillet.
Subscribe to:
Comments (Atom)